30 Days MyDFIR Challenge DAYS 15 - 30
30 days Challenge made by MyDFIR channel
12/3/202414 min read
So, let’s continue with the challenge! We have 15 more days ahead to keep practicing in the SOC field, so that’s great.
A couple of updates about the blog: I migrated from WordPress to Hostinger’s own builder because I wanted something easy to use with low maintenance. This has actually been a huge time-saver and avoided a lot of problems!
If you’ve only read this part, feel free to check out the last section where I covered the first 15 days of the challenge.
All credits go to MyDFIR on YouTube for putting together these challenges to help people practice!
Now, let’s begin!
DAY 16
Today, we’ll start from the discovery tab. We set the timestamp for today, and there’s a bunch of documents—it’s crazy!
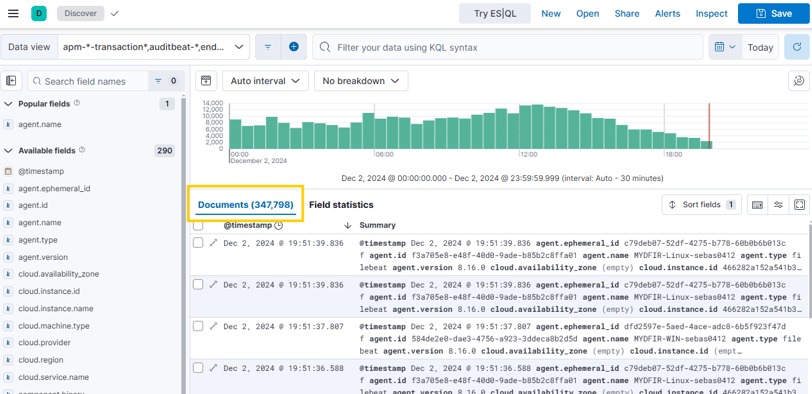

We can create a query to detect brute force attacks in RDP using event code 4625.
With this and our SSH alert, we can start generating alerts!
Now, let’s check if any alerts are being triggered.
And actually, an RDP alert was generated pretty quickly!
Right now, the alerts we’ve created are quite simple, and the information provided by them isn’t very useful.
So, we’ll need to create a more detailed rule!
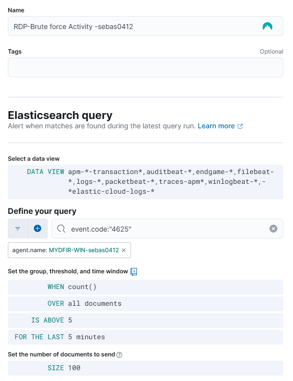
Rules are much more detailed and provide more information than the alerts we recently created. We’ll use the exact same query that we used for the SSH alert.
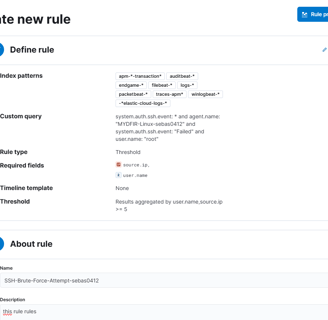
Now that the rule is created, it will provide more details than the alerts we had.
We need to create another rule for RDP, and it’s exactly the same process as the SSH one.
Now both rules are running and working, and we have our first alerts. As we can see, this rule shows us the IP address and the user they’re using.
Today was a really long day, but we learned a lot more. Now, I know how to work with rules and test what kind of events we can create alerts for.
DAY 17
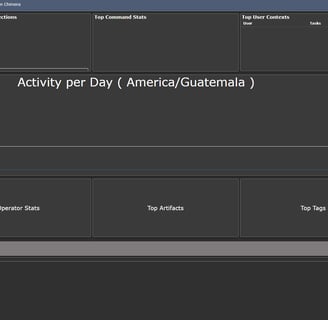
Today, we’ll create a dashboard using the rules and alerts we set up yesterday! This is great because we can start visualizing all the data that has been collected over the past few days.
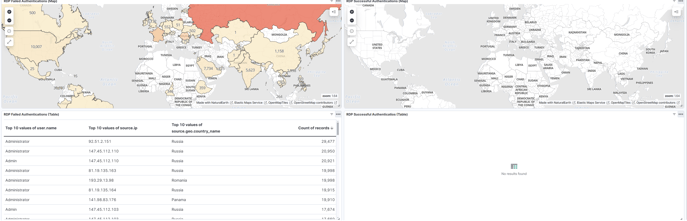
First, let’s move to Maps in our Elastic Web GUI. Similar to the SSH map we created, let’s do the same with this one!
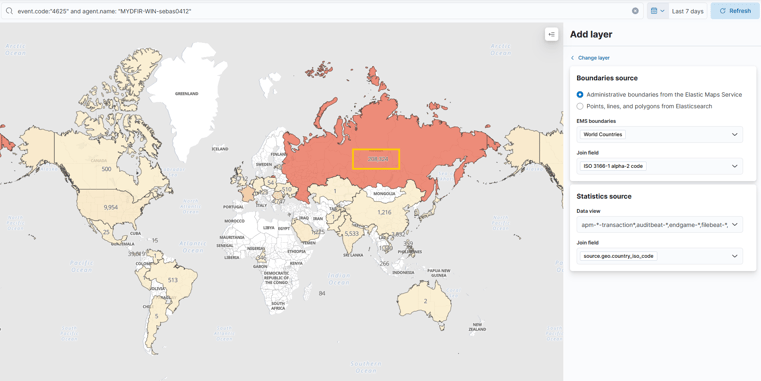
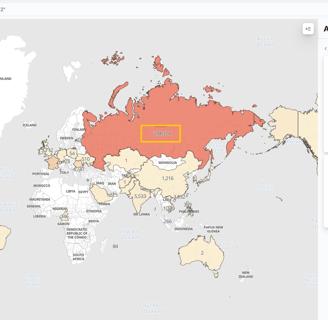
And it's crazy how many attempts from around the world we can see in just a couple of weeks!
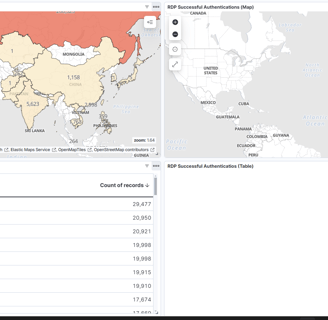
Now, let's create one for the real problem: successful authentications. I’m not going to lie, I’m kind of nervous to see if anyone has successfully accessed my servers.
Okay, there were no successful logins, which is great—though a little sad, I wanted to see how it would look, haha. Here’s the dashboard. I’m not sure why my SSH success map disappeared, but I’ll add it later!
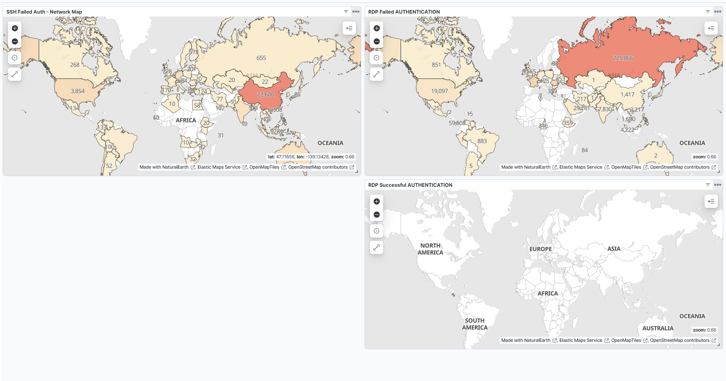
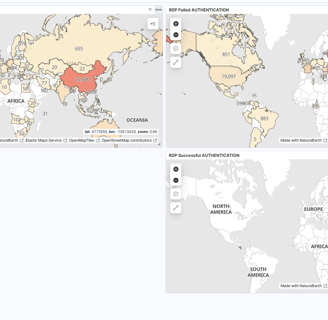
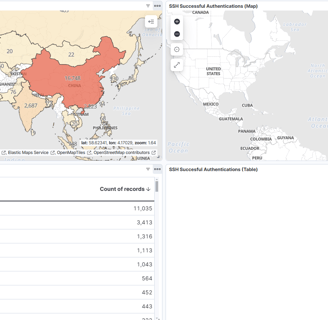
Now, we can add a table to improve the visualization in our dashboard with data, using the SSH rule. Let’s set up one more for RDP!
And that’s it—we now have a panel with maps and tables, containing all the information we need.

The last thing is to save the dashboard, and that’s it for the day. These days are getting really long, and I’m trying to keep each day as short as possible because there are still many days left!
DAY 18
Today, we will learn what a C2 is and why it's important. Let’s go!
Command and Control (C2): Refers to techniques that adversaries may use to communicate with systems under their control within the victim network. (MITRE ATT&CK)
Common tools for C2:
Metasploit
Cobalt Strike
Sliver
Mythic (we will be using this one in this project)
And that’s it for the day! I learned a lot about C2 and its tools. Now, we can start planning our attacks!
DAY 19
Today we will create a Attack Diagram!
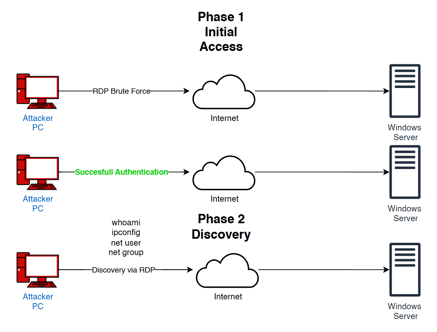
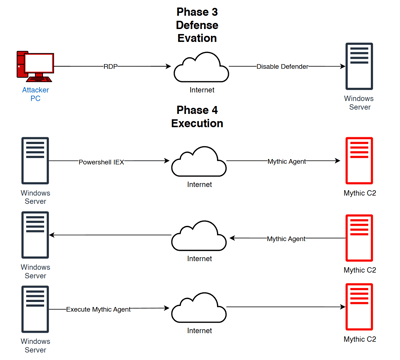
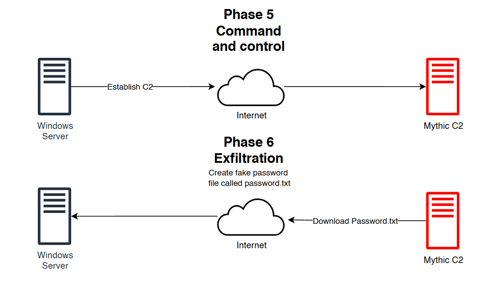
this are the Diagram and planing to make an attack to our windows Server, Using a C2 server using Mythic.
DAY 20
Today, we will start with the attack, so let’s set up our Mythic C2 server! This Command and Control setup will be built on VULTR, just like all the other VMs we’ve set up.
In the video, it was asked to install Kali, but since I already have a Kali VM set up in VMware, I’ll skip that part.
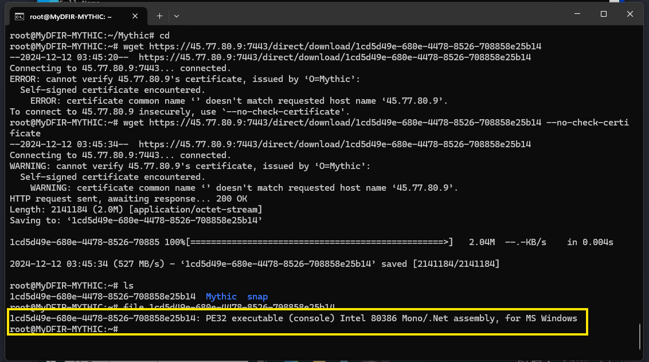
I just created the VM for Mythic in VULTR, and now we need to start an SSH session. First, we’ll update and upgrade the system!
Since we’re going to run Docker Compose, let’s install Docker Compose and then git clone the Mythic repository.
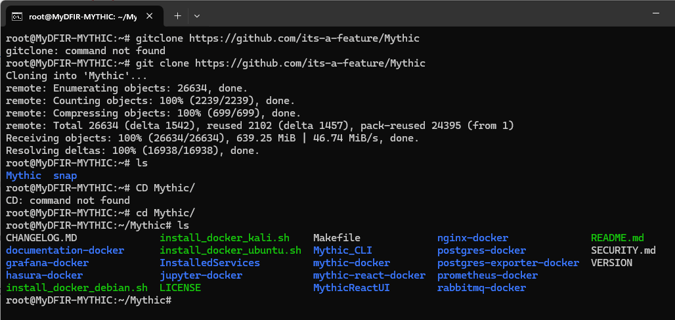
We want to install the shell script "install_docker_ubuntu.sh", so we just run it, and it will install the Docker container with Mythic.
However, after installation, we’ll notice that the Docker service isn’t running. So, we need to restart the Docker service with:
systemctl restart docker
Then, we’ll run make to complete the installation.
Once that’s done, we can start the Mythic CLI with:
./mythic-cli start
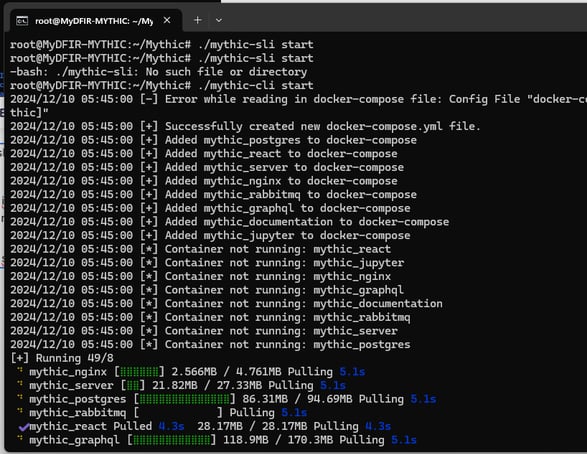

Once the Mythic server its running we can go to the Web GUI!
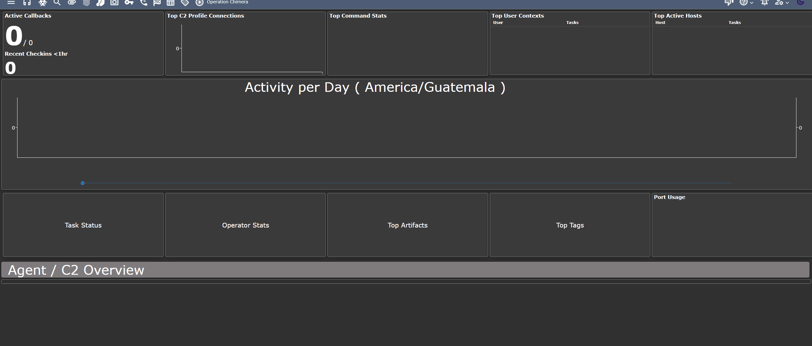
And that’s it! We’ve just set up a Mythic server, and now we have access to the web GUI. The next days will likely be focused on performing attacks on our machines, so I’m really excited for that!
DAY 21
Today, we’ll learn how to perform a brute force attack!
This is pretty cool. I’ve always been really interested in the offensive side of cybersecurity, and starting to perform my own attacks is exciting!
The first thing we need to do is create a fake "passwords" file, which will be the main target for this attack. We’ll create this file on our Windows server, which is our main target.
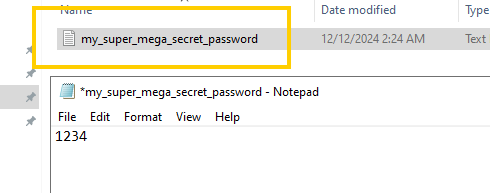
as you can see its pretty secure.
Ok once we have our objective. lets start in kali and we are going to do an RDP Brute Force!
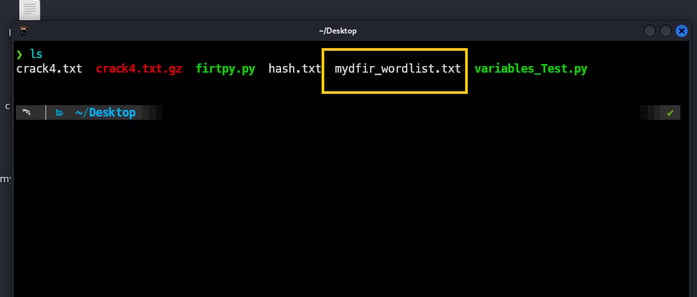
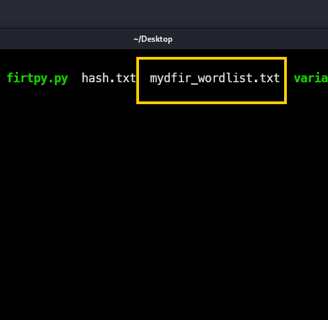
for Brute force we can use a wordlist in this case we will use "rockyou" that its a popular word list with a list of common passwords, but in this case just for the practice we will add to this wordlist our password, just for the brute force attack to be faster, because the password of my windows machine its actually kind of strong and move some of the words to our own cutom wordlist.
For the brute force attack, we will use the Crowbar tool, specifying the RDP service, with the username Administrator, using our custom wordlist that includes my password. Lastly, we will try it against our Windows Server.
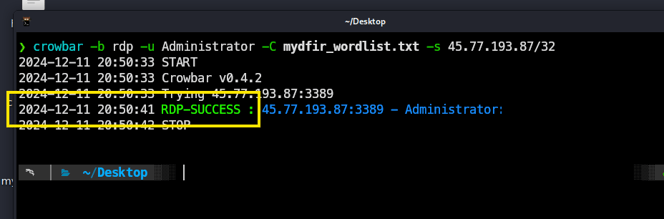
As you can see, it’s a success! Now we know the password for this Windows server and can start an RDP session. Obviously, this is just for practice— in the real world, it would be much harder to crack, since this password is really strong!
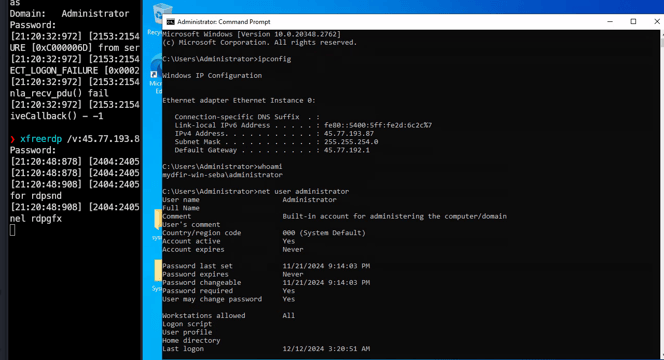
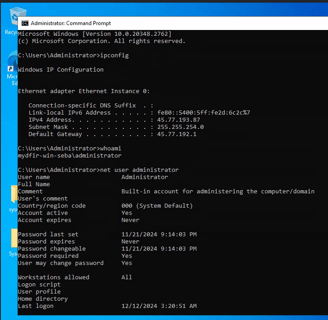
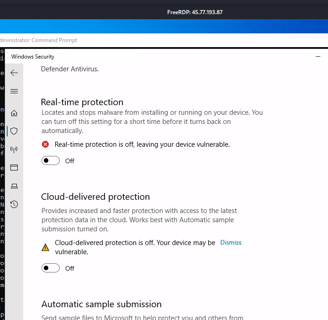
Now we have RDP access from our Kali machine, and with this, we can run some commands to gather information about the user. We find out that this user is an administrator, so we can proceed to disable Windows Defender and move on to the next step!

Now we’ve started executing the Command and Control with Mythic. We need to install some agents in Mythic, so we’ll need to look into the Mythic repositories for available agents.
here is the link: https://mythicmeta.github.io/overview/agent_matrix.html
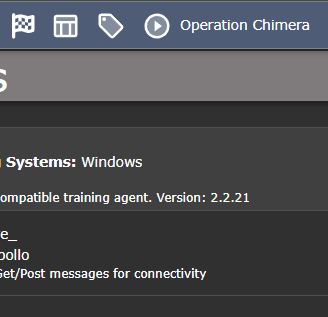
For this project, the selected agent is Apollo!
And for the C2 profile, we will use HTTP.
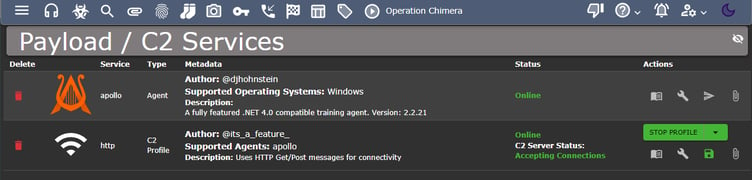
Now it’s time to create a payload, and here it is in our Mythic server:
Note: I know I’m moving pretty fast and skipping lots of details, but it’s necessary to keep the blog from being too long. I’ve also created a specific lab just for Mythic, as I’m really interested in getting to know how it works in more detail.
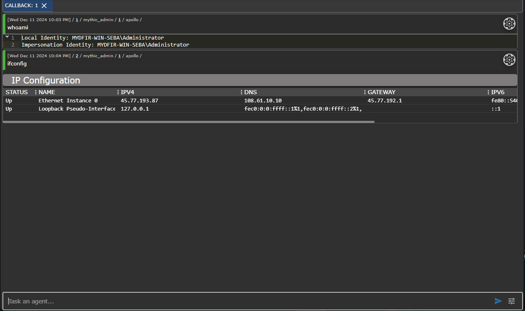
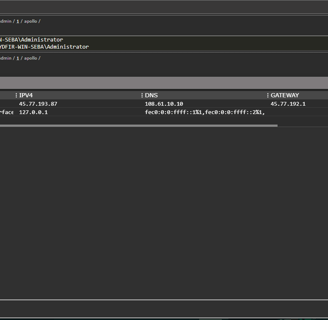
We’ve set up everything to start the connection from our Windows server to our Mythic C2 server and initiate the command and control. Once all of this is done, here are the results:
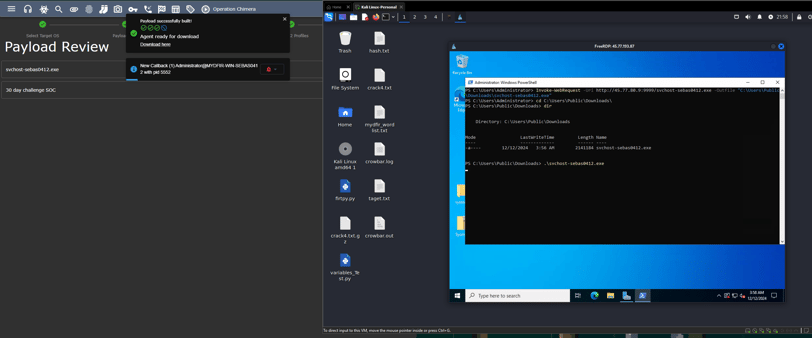
Now we have the ability to run commands from our Mythic server to our Windows machine, and we have full access to the machine. This is pretty cool!
Now the last step in our attack its to steal the "supermegasecretpassword"

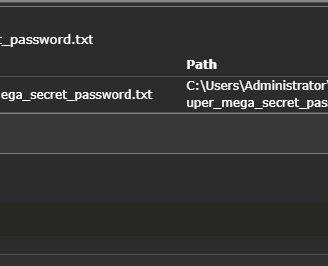
And there it is—we just stole one of the top-secret passwords!
Joking aside, this is pretty cool. Obviously, it’s much easier than a real-world attack, but it demonstrates how someone can access our information and maintain control of our devices without us even noticing!
This day was crazy long, and this blog is going to be extremely large! But we’ve tackled one of the most fun parts Steven planned for us in this project. I really enjoyed it and had a lot of fun learning about Mythic and brute force attacks. I will definitely set up another lab on this on my own!
DAY 22
Today, we will create a dashboard to gather all the information related to the attack we performed with Mythic yesterday!
For this, similar to the SSH and RDP rules, we need to generate a query and add it to the dashboard. I’ll try to make this day shorter!
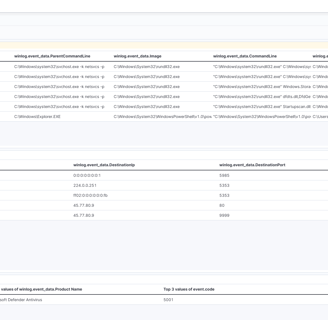
We need to look for svchost-sebas0412.exe, the executable we created to C2 our Windows machine. We can filter by event code: 1, which corresponds to the creation event.
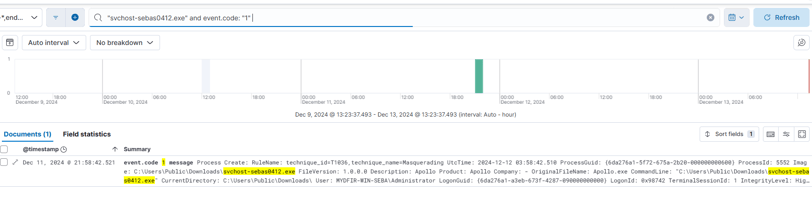
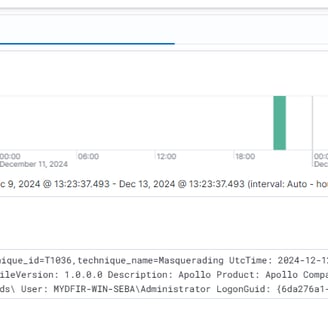
This is our final query:
event.code: "1" and (winlog.event_data.Hashes: E9AF86587586896D2B621F46FC3122A7208743707F1293A57E21838872D3D48F or winlog.event_data.OriginalFileName: "Apollo.exe")
With this query, let's create our rule!
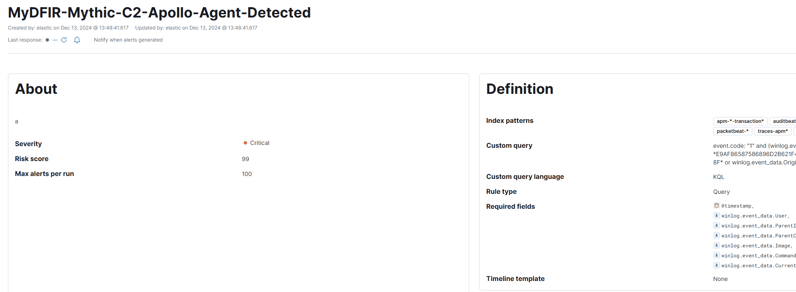
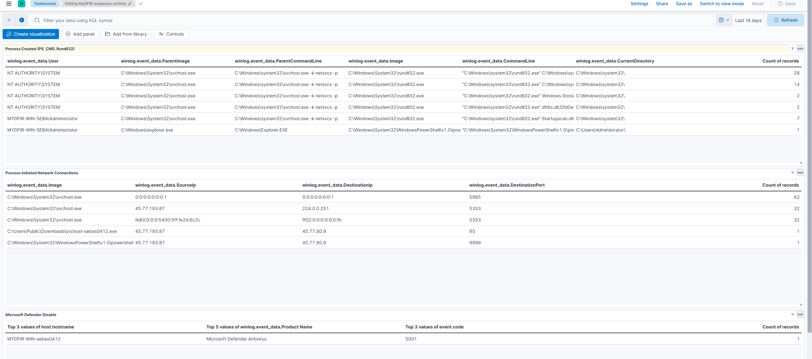
Now it’s time for the dashboard, just like the RDP and SSH rules! And there it is—it was pretty much the same as the other dashboards we created. Now we can visualize all the related data about our Mythic attack!
DAY 23
Today, we will learn how a ticketing system works!
Ticketing System: A system used to generate tickets for essentially anything you need, such as:
Alerts
Complaints
Troubleshooting
The main objective of a ticketing system is to keep a record and ensure accountability for every request and its solution. For this project, we will use OSTicket, an open-source ticketing service similar to Jira and Zendesk. It will be a great opportunity to self-host a ticketing service and practice with it!
DAY 24
Today, we will set up our ticketing system with OSTicket.
The first step is to create a new Windows VM in Vultr. I've already shown this process, so I’ll skip this part!
Once the VM is running, we just connect through RDP.
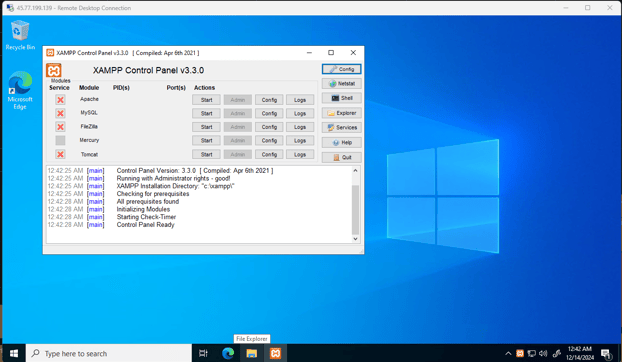
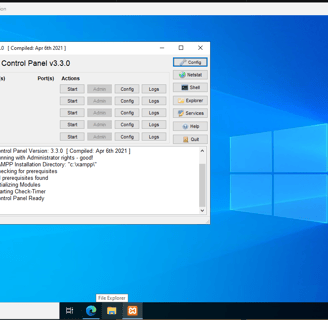
For hosting the web server, we will use XAMPP, a tool I’ve never used before, so it’s pretty cool! We need to visit the webpage, download it, and install it—pretty simple.
Now, we can see the control panel!
Next, we need to add some firewall rules to allow connections through ports 80/443 and set up the firewall rule in our Vultr firewall to only allow our selected IPs to access the Ticketing System.

Now, with all of these setups completed, we can start our services—Apache and MySQL.
We now have access to our phpMyAdmin Web GUI. In the web GUI, we need to change the localhost IP to our Ticketing Server's IP to allow access through the internet. Since we set up the firewall rules, I’m the only one who will be able to access it.
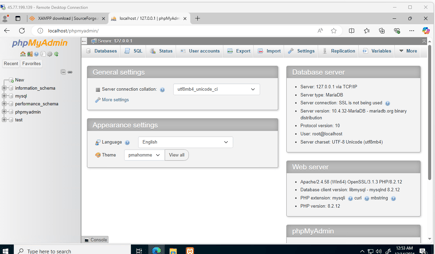
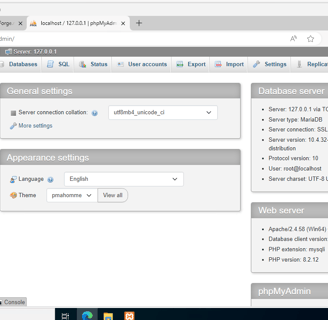
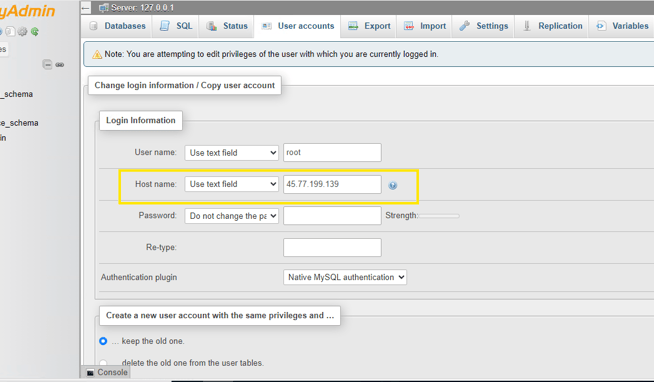
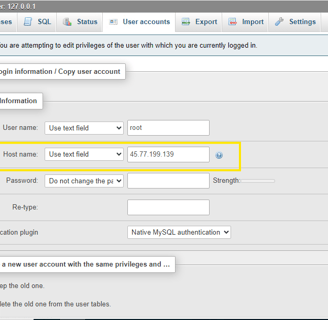
Now that all of these setups are completed, we can start our services, Apache and MySQL.
We now have access to our phpMyAdmin Web GUI. In the web GUI, we need to change the localhost IP to our Ticketing Server's IP to allow access through the internet. Since we set up the firewall rules, I’m the only one who will be able to access it.
Now, let's install OSTicket!
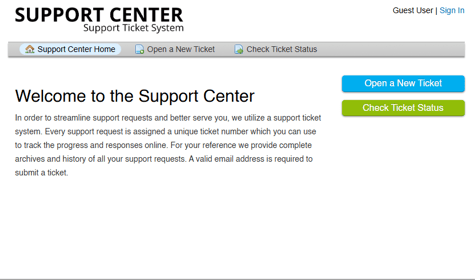
We simply need to download it, extract the files, create a new folder in the XAMPP - htdocs directory, and move the extracted files into the new folder. And there it is—our OSTicket Web GUI.
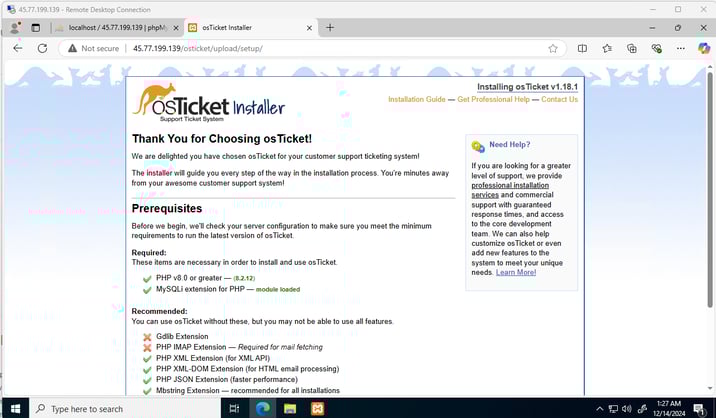
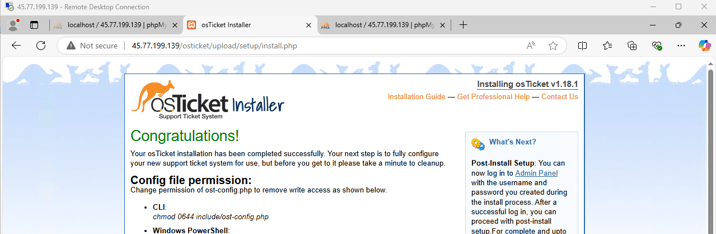
We have installed osTicket! and I can acces from my personal computer to the Ticket Page and create a my first ticket!
DAY 25
Today, I will integrate my osTicket with my ELK stack and send test alerts into osTicket! Let's go!
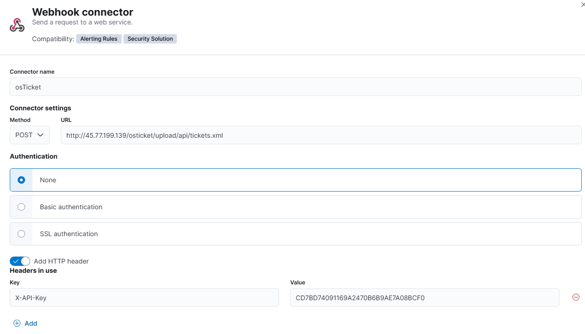
The first step is to add an API key to our osTicket.
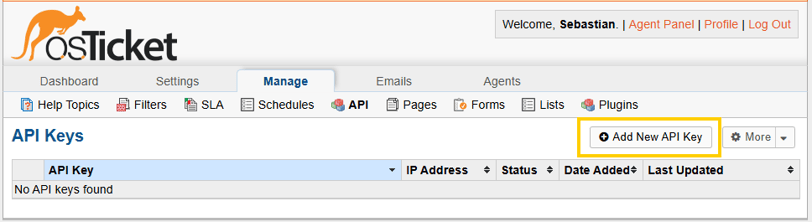
As we are hosting everithing in VULTR with the same VPC and network, we can add the private IP of our ELK server to our osTicket
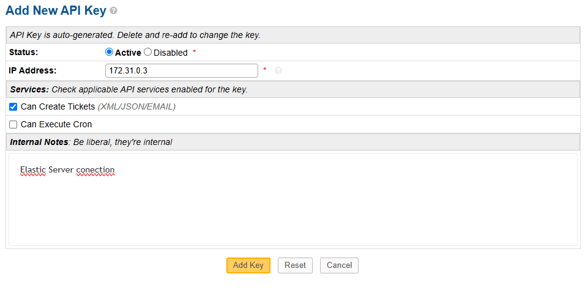
This will generate an API key that its what we will use to connect my Ticket with my Elastic. like this!
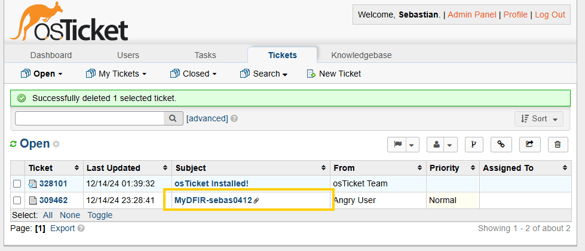
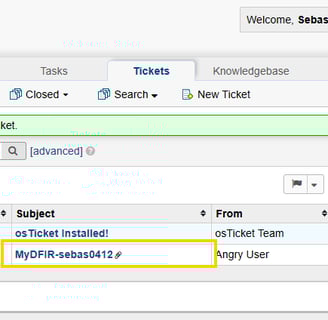
Once created we need to run a test, and if everything works as expected we can see our ticket!
DAY 26
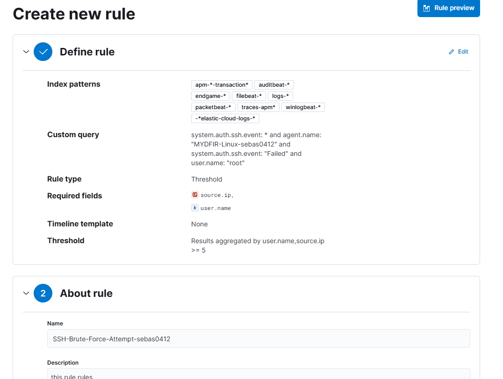
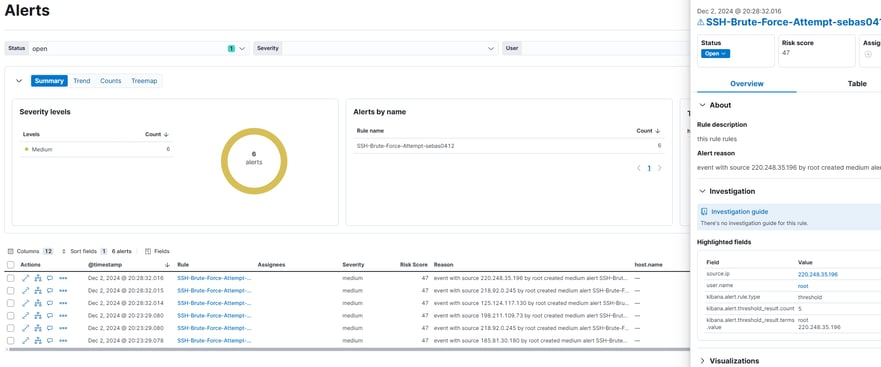
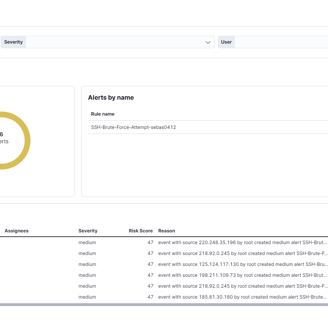
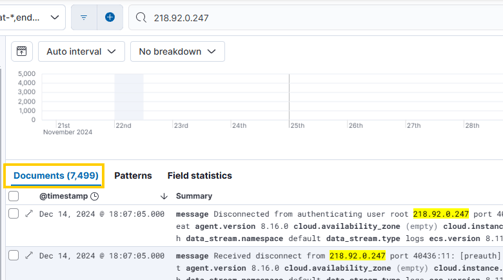
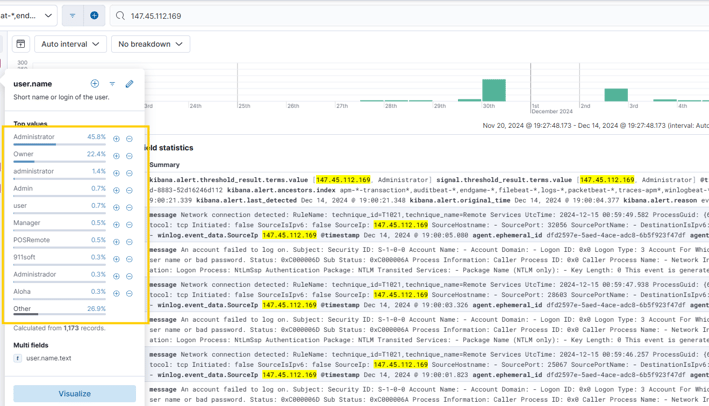
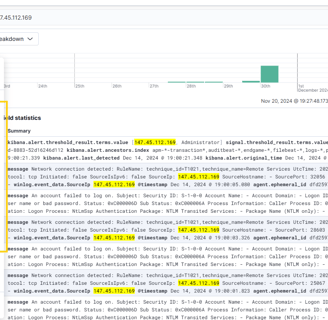
Today, we will investigate an SSH brute force alert!
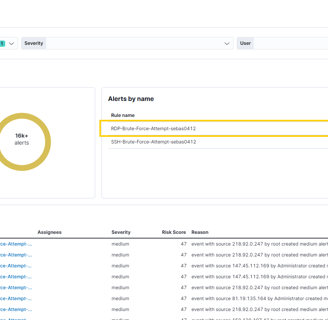
First, let's move to alerts, and we can see a total of 700 alerts generated over these days. It's crazy how many RDP and SSH alerts we've had in just a couple of weeks!
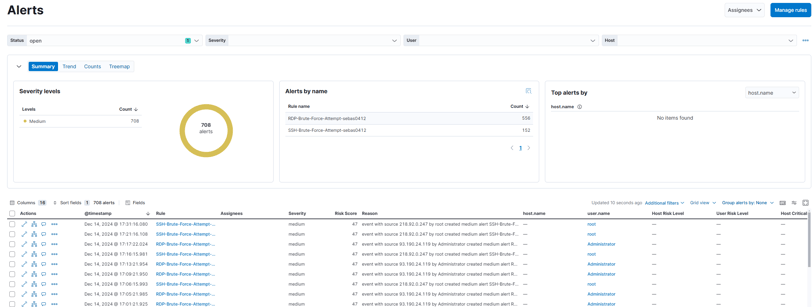
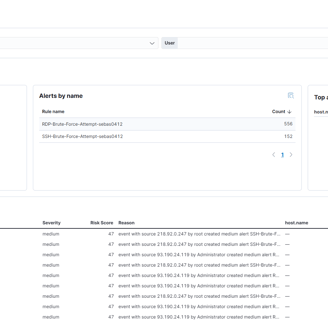
Let's check one of the alerts. While investigating brute force, we can search for:
IP: Is this IP known to perform brute force activity?
Users: Are any other users affected by this IP?
Were any of the attempts successful?
If successful, what happened after the successful login?
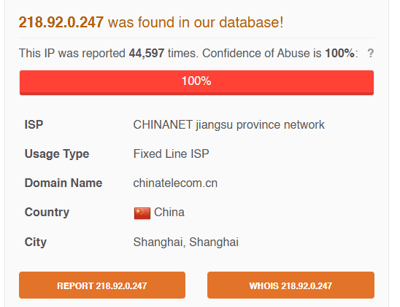
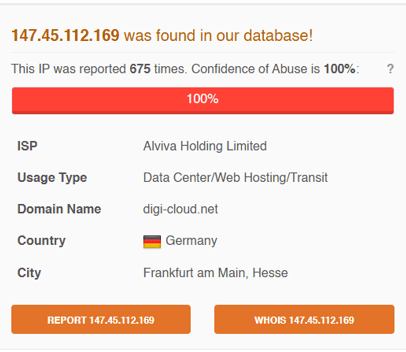
As we can see, this IP is actually known for performing this kind of activity:
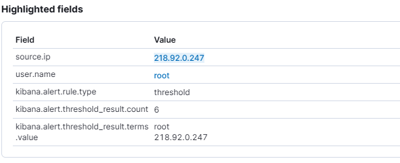

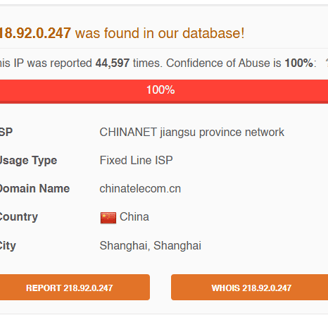
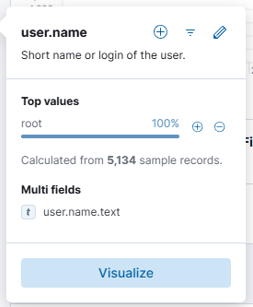
Are there any users affected by this IP? As we can see, there is a lot of activity related to this IP, but it's always attempting to attack the root user.

Were any of them successful? Let's check!
Great! No results for "Accepted" — that means we're good! Aside from all the brute force activity, they didn't manage to get into my server!

DAY 27
RDP Brute Force Investigation Time!
Today, we’re diving into an RDP brute force alert investigation. It’s pretty similar to yesterday’s SSH investigation, so let's see how this one goes!
Starting from the alerts panel, and wow — over 12,000 alerts in the last 24 days! That's a lot of data to sift through. 😅

Since this is another kind of brute force attack, we will use the same methodology as yesterday.
Is this IP known? Yes, it’s flagged and reported for performing brute force attacks!
Are there more users affected by this IP? As we can see this time there its a lot of Users, so yes!
Were any of them succesfull? And there is no successful activity from this IP!
DAY 28
Today, Steven shared an excellent video breaking down the investigation process for the C2 attack we set up a few days ago using Mythic C2. I didn’t document the process in detail for the blog because I was fully focused on following along, but here are my main takeaways:
File Creation and Process Tracking:
The attack started with a suspicious file being created, followed by the execution of new processes. This step highlights the importance of monitoring process creation events in your logs.Network Connections:
The investigation uncovered an outbound network connection to an external IP. Identifying these connections is key to tracing potential C2 infrastructure.PowerShell Analysis:
The connection was initiated through PowerShell commands, emphasizing the need to log and analyze PowerShell activity for malicious patterns.ELK’s Role in Detection:
Tools like Kibana dashboards and enriched log queries were crucial in visualizing anomalies, such as traffic spikes and domain resolution patterns.
This exercise was incredibly helpful in understanding the SOC analyst’s role in identifying and responding to potential malicious activity.
DAY 29
Today we will install Elastic EDR: Elastic Defend.
What is Elastic Defend?
Elastic Defend is an endpoint detection and response (EDR) solution that integrates directly with the ELK Stack (Elasticsearch, Logstash, and Kibana)! It enhances security by providing real-time monitoring, detection, and response directly within your Elastic Stack environment. With Elastic Defend, you can:
Monitor endpoints for suspicious activity
Detect and block threats instantly
Investigate and analyze incidents using powerful ELK tools
Automate responses to threats for faster actions
Adding Elastic Defend to your ELK Stack unlocks the full potential of your security operations.
This challenge has been an incredible learning experience! I gained valuable hands-on skills using the ELK stack for security operations, and here's a recap of what I learned:
Using the ELK Stack: Analyzing threats, creating rules, and visualizing data through dashboards was at the heart of this challenge.
Brute Force Attacks: I set up a C2 server and simulated brute force attacks, learning how attackers can gain access through weak passwords.
Cloud Provisioning: Using cloud services like Vultr for creating virtual machines to simulate attacks and setups in a controlled environment.
Endpoint Monitoring: Monitoring Windows and Linux hosts, collecting logs, and making sense of large datasets to detect suspicious activities.
Elastic Defend: I explored the power of Elastic Defend to monitor, detect, and respond to potential threats within the Elastic Stack.
I’m really excited to apply all this knowledge and implement what I’ve learned to build my own cybersecurity homelab!
A big shoutout to Steven from MYDFIR for creating this challenge on his YouTube channel! It was a fun and educational journey, and I’ll definitely continue building on what I’ve learned here.